Friday, December 31, 2010

Happy New Year!

Hi everyone, I want to wish you a very happy new year! Thanks for visiting my little blog over the last 2.5 years. Thanks for your sweet comments and the inspiration you provide to me. I love how blogging has changed my life. I've gotten to know so many of you around the world. I've been lucky to actually meet several of you in real life, which has been a complete thrill.

Let me tell you the tale of my annual Christmas card that became this Happy New Year card instead. I struggled with the design this year and ran behind schedule. I stamped several "Merry Christmas" and "Feliz Navidad" cards, but then had to switch to making them "Happy New Year" cards instead, since they would not be sent out before Christmas. Several items were pre-determined: I was using this Simply Chartreuse and Plum Pudding paper from Papertrey Ink and the patterned paper from them as well. I also had some patterned paper from Stampin' Up. I loved this swirl background stamp from Hero Arts that I bought when I was in Seattle last month. I wanted to use baker's twine. I wanted the cards to be relatively flat, so they wouldn't cost extra postage. Normally, I'll make about 4 different designs for the card. This year, I had many more variations of the design! Come on, Anthonette, make up your mind!!!

Here's a photo collage of the variations of the design in making the 50 cards.

Next year, I'm going to order a pre-made photo card and then just embellish it slightly. I totally LOVED this card that Kim Hughes ordered from Snapfish and then embellished with baker's twine, buttons, and some cardstock leaves.

Have a good one!

Saturday, December 25, 2010

Feliz Navidad!

Hi Everyone, Feliz Navidad to those of you who celebrate! Hope you had a happy & blessed Christmas. I'm lounging around & taking it easy. I thought I'd try blogging from my iPhone, since I've never done it before. I couldn't publish this post from my iPhone because there was a problem with the photo, so I still haven't blogged from my phone.

Here's a picture of our tree. I used the Hipstamic app on my iPhone for the picture.

The Little Guy had fun tracking Santa last night on NORAD's Santa website. He loved all his gifts (mainly Legos). He's been a really good kid.

This morning I baked Pioneer Woman's recipe for cinnamon rolls; oh my...delicious! Did you see her recently on the Today Show making this recipe? I'm going to make them every Christmas morning from now on; they are that good.

Have a good one!

Tuesday, December 21, 2010

And the Winner of the $25 Kiva Gift Card....

... is Sarah Martina Parker! I emailed you your $25 Kiva Gift Card.

This morning bright and early I drove to a new Target store near me. To show you how much I don't shop, the store has been open since mid-October and this was my first time visiting. Since I was sleep-deprived, I decided to get in line for a non-fat peppermint mocha caffeine boost at the Starbucks located in the store. Three people were ahead of me. The woman paying for her coffee announced that she was buying drinks for the 3 of us in line behind her; how incredibly sweet is that? This is the first time I've received a random act of kindness like this. It totally made my day and I actually enjoyed shopping. I was there for 2 hours. The store was very empty, which made it even nicer.

Go out and have a great day and be inspired to create your own random act of kindness!

Monday, December 20, 2010

Matching Card & Gift Card Holder

Hey there! It's been a busy couple of days. I've been creating our annual photo Christmas card. Instead of Christmas cards, my cards will arrive closer to New Years...sigh. I'll post it here in a couple of days.
Before I forget, please go to this post and add your name for some blog candy. Deadline is tonight!

Here's a card and matching gift card holder that I designed for PSA Essentials. The stamps come from a set called Smirk Happy Holidays. The designer paper comes Stampin' Up. The gift card holder template comes from Kristina Werner.

Thanks for stopping by!

SMIRK COUPLE CARD Ingredients
Stamps: Smirk Happy Holidays (PSA Essentials)Paper (all from Stampin' Up): Jolly Holiday designer series paper, Very Vanilla, Kraft, Cherry Cobbler, Old Olive Ink: Cabernet (PSA Essentials)
Tools: 1.75" circle punch (Stampin' Up), 2" circle punch (Fiskars), Corner Chomper (We R Memory Keepers)
Other:
Baker's twine (Etsy), rhinestone (Michael's), Tombow Mono Multi Liquid Glue, foam tape (3M), Copic markers, Old Olive buttons (Stampin' Up), white gel pen (Sakura)

SMIRK COUPLE GIFT CARD HOLDER Ingredients

Stamps: Smirk Happy Holidays (PSA Essentials)
Paper (all from Stampin' Up): Jolly Holiday designer series paper, Very Vanilla, Kraft
, Cherry Cobbler Ink: Cabernet (PSA Essentials)
Tools: 1 1/16" circle punch (EK Success), 1.25" circle punch (All Night Media)
Other:
Old Olive ribbon (Stampin' Up), rhinestone (Michael's), gift card template (Kristina Werner), Tombow Mono Multi Liquid Glue, foam tape (3M), Copic marker, brads (Making Memories), Velcro

Thursday, December 16, 2010

Want a $25 Kiva Gift Card?

Hi everyone,
In the holiday spirit, I'd like to give away a $25 gift card to Kiva to any of my readers (US or international). What is Kiva? It's my favorite micro-lending website. You can choose to loan $25 to entrepreneur(s) anywhere in the world. Here's a video from Kiva to explain how Kiva works:

Fellow paper crafter, Savitri Wilder, also makes loans through Kiva.

This year, Oprah chose Kiva as one of her "Favorite Things 2010". I first heard about Kiva on Oprah's show back in June of 2007. I've been making micro-loans through Kiva ever since. Kiva has an extremely high success rate of people paying back their loans. When the money is paid back, you can reloan the money or withdraw the money from Kiva. In the 66 loans my family and I have made, only 2 entrepreneurs have only partially paid back the $25 each; that's an amazing number.

What do you have to do? Just enter a comment below before Monday, December 20th at 11:59 PM PST. I'll use my version of Random.org (my son, Kalino) to pick a winner on Tuesday. The gift card will be emailed to the winner. Good luck!

Tuesday, December 14, 2010

A Gift Tag & Some Gift Card Holders

Wow, the hours each day pass by too quick! I started this blog post this morning and it's already after 10 PM. Yikes!
Instead of finishing this blog post, I was a regular Martha Stewart in the kitchen today (well, not really..you'll see why in a second). I baked a raspberry cheesecake for Sweetie's party at work tomorrow. It's almost done. It's chillin' so I can add the raspberry layer before the night is done. I roasted eggplant and red, green, and yellow bell peppers. I burned the eggplant! What a waste. I didn't burn the peppers. I made what I call a Martha Stewart pressed sandwich. I'll have to give you the recipe here at another time. It's yummy!

Today, this tag and some gift card holders I created for PSA Essentials were featured on their blog today.

Here's a gift card holder that I cut using my Silhouette cutter. The reindeer stamp comes from a set called Smirk Merry Christmas.

Here's how the gift card holder looks on the inside.

This next gift card holder is from a template from Kristina Werner. Love this template! I've used before (here and here). The reindeer stamp is from another Smirk set called Smirk Happy Holidays.
Here's a view of the inside. Go forth my dears and make some gift card holders and tags!

There are several ways to win some PSA Essentials products. You have until tomorrow night (Wed, December 15th @ 11:59 PM EST) to enter this giveway. Paper Crafts Magazine and PSA Essentials also have a giveaway on their Facebook pages, but you have to hurry!

Well, I've got to get to bed early. I'll be on an all-day field trip tomorrow with Kalino and his classmates. Later!

PAPER PINWHEEL TAGMaterials UsedStamps: Christmas Tree (PSA Essentials)
Paper: Kraft (CA Paper Goods), Very Vanilla
(Stampin' Up), patterned paper (Stampin' Up) Ink: Hunter (PSA Essentials)
Tools: Silhouette digital cutter and tag design, Tim Holtz Paper Distresser (Tonic Studios), Crop-a-Dile (We R Memory Keepers), 1" circle punch (Stampin' Up), 1 1/16" circle punch (EK Sucess), 1.75" circle punch (Stampin' Up), Scoring Board (Martha Stewart)
Other: foam tape (3M), ribbon (Stampin' Up), Tombow Mono Multi Liquid Glue, button (Papertrey Ink), baker's twine (Etsy), Copic marker, Zots adhesive

MERRY CHRISTMAS - TREE GIFT CARD HOLDER Materials Used
Stamps: Smirk Merry Christmas (PSA Essentials)
Paper (all by Stampin' Up): Jolly Holiday designer series paper, Kraft, Very Vanilla, Old Olive, Cherry Cobbler
Ink: Cabernet (PSA Essentials), Tuxedo Black (Tsukineko)
Tools: Silhouette digital and giftcard design, 1.75" Circle punch (Stampin' Up), 1.25" circle punch (All Night Media), Scoring Board (Martha Stewart)
Other: Tombow Mono Metal Liquid Glue, baker's twine (Etsy), red rhinestone (Michael's)

REINDEER GIFT CARD HOLDERMaterials Used
Stamps: Smirk Happy Holidays (PSA Essentials)
Paper: patterned paper (American Crafts), white (Papertrey Ink), Kraft
(Stampin' Up) Ink: Black (PSA Essentials)
Tools 1 1/16" circle punch (EK Success), 1.25" circle punch (All Night Media)
Other:
baker's twine (Etsy), rhinestone (Michael's), gift card template (Kristina Werner), Tombow Mono Multi Liquid Glue, foam tape (3M), Copic marker, brads (Making Memories), Velcro

Sunday, December 12, 2010

Congrats Melisa & Andy!

Hi everyone, hope had a great weekend. Here's a tag I designed for a wedding that took place today at a local winery. Angie, one of our school secretaries is the mother of the groom. I previously created these tags for Angie's mom.

You can see the other tags in the background. I created a little over 100 tags for their wedding favor containers. In Stampin' Up colors, Melisa's colors were Elegant Eggplant and Rose Red. She also had a gray/silver color in her wedding decor, so I heat embossed the small silver heart. The shape of the tag is a Silhouette Studio tag design that I modified. (That's what I love most about Silhouette Studio, you can easily modify or delete features from any design.)


I cut the bottom portion of the tag from Whisper White cardstock using the Silhouette cutter. I stamped a portion of the Medallion stamp using Elegant Eggplant ink on white paper and glued it to the Elegant Eggplant tag. I cut a 3/8" strip of textured Rose Red paper and glued it to the middle of the tag. The text was created using Microsoft Word and a font called Marriage Script that I got it here. I cut the half circles using a paper trimmer and a 1.75" circle punch. I then glued the half circles to the tag. The finishing touch was Love heart that was attached using some foam tape.


Thanks for stopping by!

Tag Ingredients (all Stampin' Up except where noted)
Stamps: Medallion, I Heart Hearts
Paper: Elegant Eggplant, Rose Red (Textured), Whisper White
Ink: Elegant Eggplant, Silver Encore Ultimate Metallic Ink (Tsukineko)
Tools: Silhouette cutter, Small Heart punch, Tonic Guillotine cutter
1.75" circle punch
Other: Marriage Script font (free-fonts.com), clear embossing powder, Tombow Mono Multi Liquid Glue, foam tape (3M), Microsoft Word

Wednesday, December 8, 2010

Happy Holidays - A 3D Tree

Hello dear readers. Happy Hannukah to those of you celebrating the last day of Hannukah today. I am not ready for Christmas. There...I said it! I'm tired of always being behind schedule when it comes to this time of year. I've shopped for myself (do you do the same?). I have this new sweet machine! But when it comes to shopping for my family, I'm way behind schedule. I haven't started making the 65 copies our annual Christmas card. I designed this one, but I haven't finalized the design. Well, enough of my blabbing.

This is a 4.25" square card I made when I visited Ericka in Seattle last month. We worked till all hours of the night in her studio.

I loved Ericka's selection of paper punches! I had fun using this large tree punch made by EK Success. I punched 4 trees and then scored them in half verically. I glued each half to the half of the next tree. I love that the tree folds down pretty flat for mailing purposes. I added a rhinestone to the tree top and baker's twine to finish it off. The border stamp around the square patterned paper is from a Fiskars stamp set called Layer Away Dots. I'm not sure what company make the Happy Holidays stamp. I think the paper is from Memory Box; I'm too tired to go downstairs and check. Hehe!

Thanks for stopping by.

Sunday, December 5, 2010

A Hambly Make-n-Take .....From Last Year!

This summer I found the make-n-take I made at Hambly Studios last December! I wondered where it was. The card and envelope were in the glove compartment of one of our cars. The card is a postcard-style card made from an awesome overlay. The sentiment is a rub-on.

Part of the make-n-take was to also create an envelope liner with their awesome paper.

If you are in the Santa Clara, CA area, there is a Holiday Open Studio event at the Hambly Studios on Tuesday, December 7th. Details here. I'm planning to go.

Friday, December 3, 2010

We Wish You a Merry Christmas & a PSA Essentials Giveaway

I completely neglected my blog for a week. Between Thanksgiving and design deadlines, it's been hectic. Sorry! Today, a few of my cards I designed for PSA Essentials were featured on their blog.

Here is my favorite card from that bunch. This card combines two of my favorites: photo cards and my cute son! I've been designing photo cards each Christmas since the Little Guy was born 7 years ago. This picture was taken at Legoland this summer. This kid loves Legos, so it was easy to get some great natural smiles.

The card is simple, except for all the paper piecing on this tiny Snoopy image. I used a glitter pen to give the string of lights some sparkle.

I think it's so cool that PSA Essentials has licensed classic Peanuts images, like this one of Snoopy.

Do you want to win over $150 of PSA Essentials products? All the details are at the PSA Stamp Camp blog. The deadline is Wednesday, December 15, 2010, at 11:59 PM, EST.

Thanks for stopping by!

Card Ingredients
Stamps: Peanuts Christmas Wishes (PSA Essentials)
Paper: Real Red (Stampin' Up), white, Pacific Point (Stampin' Up), HP Photo paper
Ink: Black (PSA Essentials)
Tools: Scoring Board (Martha Stewart), 1.75" circle punch (Stampin' Up), 1.25" circle punch (All Night Media)
Other: Copic markers, Tombow Mono Multi Liquid Glue, Red/White ribbon (Stampin' Up), white gel pen (Sakura), blue rhinestones (Martha Stewart), foam tape (3M), glitter pen (Sakura), small scissors

Thursday, November 25, 2010

Happy Thanksgiving!

To all my American friends and family, Happy Thanksgiving (Feliz Día de Gracias)!

This little Pilgrim-inspired creation was a make-n-take I got to create at the A Muse store when I visited Seattle 3 weeks ago. Wouldn't this design make a cute place setting card?


This week, I've already done some prep work for the Thanksgiving meal. Yesterday I picked up my already-cooked turkey from Boston Market. I hate handling raw meat, especially a large turkey. This is the second year where I've left the job of baking the turkey to the professionals. 

I love the pumpkin pies from Costco, so I didn't bake my own. I thought I was smart by showing up right after they opened the store on Tuesday. Everyone one else had the same idea. Yikes, it was extremely busy! I had to park far away. I was glad to get out of there. I hate shopping, especially for food. I wish I had an assistant who could do all my shopping.
 
Last night, I made Pioneer Woman's mashed potato recipe. So good! Did you see Ree on Bobby Flay's Throwdown show last week? She beat him and these mashed potatoes are a big reason why. They have butter, cream cheese, and half & half. Awesome!


I also made a cranberry orange walnut relish from this recipe. I was going to make my mom's recipe, but I decided to try this new one. I like it when I sampled it.


Thanks for stopping by!


Monday, November 22, 2010

A Raspberry Cheesecake Recipe You Will Love

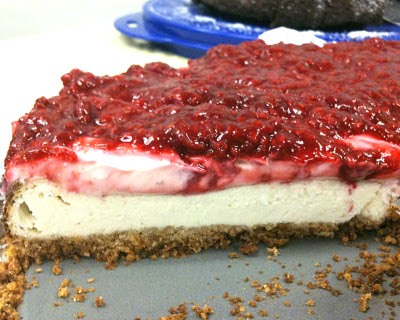
Hi! If you are ever in need of a good cheesecake recipe, here is a good one. I took this picture with my phone last week. I accidently left the cheesecake in the oven a couple of minutes too long, so my graham cracker crust was a little darker than usual. This cheesecake is actually baked twice. It is completely cooled in the refrigerator between bakings. The cheesecake layer is baked first for 35 minutes and then the sour cream layer is added on later and baked again for 5 minutes. This recipe is not quick and easy, but it's well worth it.

Last week on Twitter, I mentioned I was in the process of making this recipe. Sarah Martina Parker asked for the recipe. Between the cheesecake layer and raspberry topping, there is a sour cream layer. I'll I can say is yum!

I've made this recipe since about 1995. I got it from a online newsgroup at my previous job. It was published in the Lewiston Morning Tribune in 1994. I've never been to Idaho, but thank you Idaho newspaper! The modifications I've made to the recipe are to use low-fat cream cheese, light sour cream, vanilla paste, and Splenda.


RASPBERRY CHEESECAKE
My friends and family love the taste of this cheesecake. I always use low fat cream cheese and sour cream. I regularly use Splenda instead of sugar. I like using vanilla paste instead of vanilla extract; I like seeing the bits of vanilla bean.

Makes: 12 slices minimum; more when cut smaller
Preparation Time: At least 1 hour
Need: 10-inch springform pan
Bake Time: 35 minutes, plus second baking for 5 minutes. Preheat oven to 350 degrees.

Crust:
2 Tablespoons sugar or Splenda
1½ Cups graham cracker crumbs
4 Tablespoons unsalted butter, melted
First Layer:
3 8-ounce packages low-fat cream cheese
3 eggs
1 Cup sugar or Splenda
1 Tablespoon vanilla paste (sometimes available @ Trader Joe’s) or vanilla extract
Second Layer:
1 pint light sour cream
3 Tablespoons sugar or Splenda
1 teaspoon vanilla paste (or vanilla extract)
Topping:
1 10-ounce package frozen raspberries, unsweetened
2 Tablespoons sugar or Splenda
1 Tablespoon cornstarch

  1. Mix crushed graham crackers, sugar, & melted butter. Pat onto bottom only of large, deep, springform pan.
  2. Let the light cream cheese soften in a bowl at room temperature for at least 30 minutes.
  3. Mix together the light cream cheese, eggs, sugar, & vanilla paste until smooth and pour into pan.
  4. Bake 35 minutes.
  5. Remove from oven and refrigerate at least 45 minutes to stop cooking action.
  6. Mix together light sour cream, sugar, and vanilla paste until smooth and spread over cooled cheesecake. Bake 5 additional minutes at 350 degrees.
  7. Refrigerate until cool.
  8. To make topping, cook frozen raspberries with sugar and cornstarch over medium heat, stirring until thickened. Cool and add to the top of the cheesecake.
  9. Refrigerate for a few hours before serving.

Note: To save time, I make the sour cream layer and raspberry topping a day ahead of time.

Enjoy!
Anthonette Chavez
Anthonette@gmail.com

Sunday, November 21, 2010

Baby Card

Hi there! Hope your weekend has been good. We had an awesome impromptu dinner at a friend's house last night: enchiladas (Michoacan style), carnitas, mashed Peruvian beans, Mexican rice, and a great pumpkin cake for dessert. {Burp!}

So on to the card. I made this simple card for a baby shower at school this week. The stamps used (Jessie's ABCs and Bannerific) are from Lawn Fawn. The stamps are awesome! I love how it's easy to line up the alphabet stamps. I also love that they included multiples of the same letter; very practical.

The patterned paper I used has texture. You can sort of see the glossy areas in this photo.

For the baby shower this week, I made a Raspberry Cheesecake that my friends love. I will provide the recipe tomorrow.

Card Ingredients
Stamps: Jessie's ABCs & Bannerific (Lawn Fawn)
Paper: White (Papertrey Ink), All About Boys patterned paper (DCWV)
Ink: Basic Black (Stampin' Up)
Tools: Corner Chomper (We R Memory Keepers)
Other: foam tape (3M), buttons (Stampin' UP), baker's twine (Etsy)

Tuesday, November 16, 2010

Hello Kitty Gift Bag & Matching Tag

Hello friends! I have so many projects to show you in the next weeks. Here's a gift bag and gift tag I made for PSA Essentials using their Hello Kitty Reindeer Games set of Peel & Stick stamps. I'd like to encourage you to check-out the PSA Stamp Camp blog and become a follower. Each week, Libby posts items from the design team members. Today, she posted my gift bag.

Here's a closer look at the tag. I found this gift bag in an expensive pack at Michael's. I loved the mustard color. It goes very well with my favorite Crushed Curry paper from Stampin' Up.


For those of you asking, PSA Essentials products are available online at places like FineStationery.com, CambriaCove.com, and Expressionery.com. They are also available in stores like Papyrus. For a complete list of stores, check here.

Have a great day!
Hello Kitty Gift Bag & Tag Ingedients
Stamps: Hello Kitty - Reindeer Games (PSA Essentials)
Paper (all Stampin' Up): Very Vanilla, Crushed Curry, Melon Mambo, patterned paper
Ink: Grapefruit (PSA Essentials)
Tools: 1 1/16" circle punch (EK Success), 1.25" circle punch (All Night Media), 2" circle punch (Fiskars), Crop-a-Dile (We R Memory Keepers)
Other: gift bag (Michael's), Tombow Mono Multi Liquid Glue, pink lace, foam tape (3M), Silver thread, eyelet (Making Memories), Copic markers, glitter pen (Sakura), button (Papertrey Ink)


Sunday, November 14, 2010

Coordinated Letter Box Set

This is the lovely letter box set of cards and goodies I made during the second class last Saturday at the A Muse Art Stamps store. The amazing Julie Ebersole was the teacher.

We made:
  • the box
  • dividers for the interior of the box
  • 4 notecards
  • decorated Post-It note pad
  • sleeve for postage stamps
  • decorated metal paper clips
All the paper was already cut and scored by Her Royal Rubberness herself. LOL! I got to use a Slice machine for the first time to cut the bird and branch silhouette for the outside of the box.
I love Julie's design style. I loved her use of the silver washi tape on the upper right-hand corner of the notecard. Silver washi tape is yummy!


We did have some excitement during the class. I man walked in through the back door of the A Muse shop (I didn't see this happen) and landed up in the owner's office. From the corner of my eye, I could see a man that kept peeking out of the office. I didn't know this was the owner's office, and the man, I assumed he worked for A Muse. Well....he didn't! The owner walked into her office and did a big step back when she met up with him. He claims he was moving and was looking for boxes. Ya...right! She asked him to leave. Luckily, nothing was missing from her office.


Thanks for stopping by!

Friday, November 12, 2010

Seattle Was a Blast!

Hola! I had the best time in Seattle last weekend. It was my first trip there. Loved it! From the moment Ericka picked me up at the airport, until I flew out on Sunday evening, we were shopping at craft stores, talking about stamping, taking stamping classes, or actually stamping. On Friday night (actually, Saturday morning) we were up until 3AM! We were in her studio working away.

We had to be up early on Saturday because we had 2 classes at A Muse Art Stamps store taught by the A-M-A-Z-I-N-G Julie Ebersole. Her Royal Ruberness did not disappoint. She is so fun! These had to be my favorite classes ever. I can't remember enjoying a class so much.

Here are the cards we made during the first class. They are all fun and they are all very "Julie". I LOVE Julie Ebersole's design style!

Well, the guys and I are going to dinner right now. I'll post the projects from the 2nd class tomorrow.

Have a great one and thanks for stopping by!

Thursday, November 4, 2010

How To Videos From PSA Essentials

Hey there! Just a quick blog post since I'm running late to help set up the book fair at school. I'm pretty excited because I'm flying out tomorrow morning to Seattle...just me! While I'm going to miss my 2 favorite guys, I'm visiting one of my best friends, Ericka. Ericka has been inviting us to Seattle for years, but this is my first trip to the city. On Saturday morning, we are taking two A Muse Artstamps classes from Her Royal Rubberness (love that nickname), Julie Ebersole. It will be a thrill to meet her. I've admired her work (and sense of humor) for quite some time, so I can't wait. Besides the classes, there will be sightseeing, shopping, making cards in Ericka's studio, and meeting some of her friends.

Before I go, I wanted to let you know about some great videos that Libby at PSA Essentials created:

Adios!

Wednesday, November 3, 2010

Last-Minute Halloween Project

Hi all! Sorry for posting these several days late.

I decided to make these last Thursday night around 10 PM. I needed them for the Little Guy's classmates the following day. My Costco had a large pack of mini-playing cards in the Halloween section. I decided to give them to his classmates, instead of candy. Kids get too much candy on Halloween anyway. These were the leftovers I handed out to little ones on Halloween night. I also handed out candy.

These were simple and I was able to make them pretty fast.
The stamps are from two PSA Essentials stamp sets: Hello Kitty Trick or Treat and UBU Happy Halloween.
Treat Cover Ingredients
Stamps: Hello Kitty Trick or Treat, UBU Happy Halloween (PSA Essentials)
Paper: white (Papertrey Ink), Basic Black (SU!)
Ink: black, orange/black (PSA Essentials)
Tools: 1.75" circle punch (SU!), 2" circle punch (Fiskars)
Other: Copic markers, Tombow Mono Multi Liquid Glue

Friday, October 29, 2010

UR Glamtastic

Yay, it's the weekend! I am t-i-r-e-d. This morning was filled with Halloween activities at school. The Little Guy loved every minute of it. I wish I had a Halloween costume, but I couldn't think of anything to wear. I need to start planning earlier next year.

My card today uses a set from the PSA Essentials called Fashionista from Kyla May's artwork line called Smirk. She creates very cute artwork.

Speaking of fashion, I haven't watched the finale of Project Runway, but I happened to hear that Gretchen won. I wanted Mondo to win; I love his style and ability to combine textile patterns.

Have a good one!

Card Ingredients
Stamps: Fashionista - Smirk (PSA Essentials)
Paper: Real red die cute flower (Stampin' Up), Crushed Curry - textured (Stampin' Up), Aqua Mist (Papertrey Ink), Vintage Cream (Papertrey Ink)
Ink: Black (PSA Essentials), Tuxedo Black (Tsukineko)
Tools: Scoring Board (Martha Stewart), Circle Cutter (Martha Stewart), 2" circle punch (Fiskars), Big Shot with Sizzix Harlequin Embossing Plate (Stampin' Up)
Other: Copics, Diamond Sparkles (PSX), chipboard (Maya Road), Tombow Mono Multi Liquid Glue, Red/White baker's twine (Annie42.Etsy.com), buttons (Papertrey Ink), clear adhesive dots (Zots), Scotch tape (3M), 1/16" punch (Fiskars)

Wednesday, October 27, 2010

Susan G. Komen Gift Trio

Hey there! Today is my first day posting projects done with PSA Essential stamps. I submitted these projects last month to get considered for the design team. Libby asked me to create October projects for breast cancer awareness month. I decided to create a gift trio to give someone if they were doing a Susan G. Komen Race for the Cure walk.

I used the stamps from the Dare to Dream and Frenchie sets. I created a card, decorated a water bottle, and a Tic Tac container.

My family has been hit hard with cancer and breast cancer in particular. I've had 3 aunts (my dad's sister and my mom's youngest sisters) affected by breast cancer. 
My Aunt Christine (pictured above on the left) passed away 4 months ago from complications of an aggresive type of breast cancer called Inflammatory Breast Cancer. My aunts, mom, sisters, and cousins do annual Susan G. Komen Race for the Cure Walks in New Mexico. My Aunt Christine and Aunt Pauline are pictured here at a walk in June 2006.

Here's a picture from a few weeks ago of my Aunt Pauline (a 10-year survivor), my mom, my cousin Maya (my late aunt's daughter), my sister Leonel, my sister Esther, and my cute niece Alexa.

This photo of Maya's back brought tears to my eyes and still does everytime I see it. My 15-year old cousin Maya did the walk in memory of her mom. Let's all do our part to fund breast cancer research and to be proactive about our own health. Get your mammograms, ladies and also be aware about Inflammatory Breast Cancer, which is not detected by a mammogram.

Thanks for stopping by. I'm off to help the Little Guy with his homework and to bake some cookies.

Monday, October 18, 2010

Happy 50th Birthday - A Trio of Cards

Sorry dearies, I've actually been super busy in my little studio, but I wanted to make time to post some cards I made over a week ago. My friend Rekha asked me to make a card for her sister's 50th birthday. I actually made 3 cards for her to choose from.

This first card is my favorite and Rekha's as well. I like the Crushed Curry color with the Melon Mambo and Rich Razzleberry patterned paper. I used my Silhouette to cut the Happy Birthday sentiment. Probably the hardest part of this card was adding the dimensional adhesive behind the sentiment. I like the faux stitching around the edges and the rounded corners.

This next card is a 4.25 inch circular card. I cut the numbers with the Silhouette using some American Crafts paper. You can't see the details, but the chocolate chip paper is embossed with a woodgrain pattern. The heart stamp is from Stampin' Up and the sentiment is from Papertrey Ink. The numbers are mounted on the card with dimensional tape.

This last card is super simple and my least favorite of the trio I'm showing you today. I guess I don't like the rounded corners on top. Again I used my Silhouette to cut the Happy Birthday banner. I ran the Crushed Curry layer through the Big Shot with an impressions plate from Papertrey Ink. I rubbed some Fresh Snow ink on the embossed layer to add some dimension. The banner is on a layer of vellum.
I added some faux stitching and some purple half pearls.

Thanks for stopping by and have a great day!

Sunday, October 10, 2010

I Have a New Design Gig!


Last week, I got the news that I'm one of the 15 designers on the newly-created design team for PSA Essentials. Woohoo! PSA Essentials is a company out of Bluffton, South Carolina. They are known for their self-inking stamper and Peel & Stick stamps.

About 2 months ago, Libby from PSA Essentials stumbled across my blog. She read that we had just returned from visiting my family in Taos, New Mexico. She and her husband had been there a few years ago and loved Taos. She asked if I would like to try-out for the design team. Of course I said yes. I had seen PSA Essentials products in a local stationary store about 2 years ago. She sent me a sample of PSA products and I created several items for her to consider.

I received my design team kit last week. It is a lot of stamps and inks. This is going to be fun. The news gets even more exciting; Libby is going to be on HSN (Home Shopping Network) next month with the PSA Essentials line of products! The design team gets to design items that could possibly appear on-air.

Speaking of the design team, Carly Robertson is also on the team. I had the pleasure of meeting her at the CHA Supershow in Anaheim back in January. She was here in California all the way from Canada. Melissa Phillips from Papertrey Ink is also on the design team.

Here's a link to the PSA Essentials blog. Thanks for stopping by!