Showing posts with label Hero Arts. Show all posts

Monday, December 24, 2012

Merry Christmas - Chalkboard Style

To my friends and family here and all around the world, Feliz Navidad! May this season bring you and your family blessings and good health.

This is my annual photo Christmas card. The stamps are all from the Holiday Sayings set from Hero Arts, except for the Lawn Fawn banner stamp.

With all the inspiration on Pinterest regarding chalkboards and when I saw Betsy Veldman's chalkboard-inspired cards here, I knew I had to create our Christmas card with that inspiration. This card is probably one of the most time-consuming cards I've ever tried to mass-produce. It involved embossing, die cutting felt, using a white pencil to color in chalky details, rubbing white pigment ink over everything (my favorite step) to give the chalkboard authenticity, and slicing an opening above the banner to insert the photo. I ran out of steam after creating 60 of these babies. Sorry to all my local friends who will not be receiving one of these cards this year.

Thanks for stopping by! I've got to get downstairs to get dinner prep started. Ho, ho, ho.

Monday, June 11, 2012

Look Who's Turning 2

Our friend, Little Miss A, turned 2 this weekend. Here's the card I made for her 2nd birthday. The white card base was made with the heavy white cardstock from Papertrey Ink. I recently bought some new washi tape from Target and Groop Dealz, so I layered different washi tapes on the card base.

The design and dry embossing was completely inspired by these cards Lisa Spangler made where she dry embossed the washi tape after she placed it on cardstock. I loved the look so much, I had to try it out immediately. I used the By the Numbers impression plate from Papertrey Ink on front of the card.

I took this picture of Little Miss A when the kiddos had a playdate and I ran it through the Instagram App on my iPhone. After printing the photo on 4x6" photo paper, I trimmed it to look like a Polaroid photo.

The sentiment stamps are from Papertrey Ink and the chipboard number is from American Crafts. The baker's twine is from The Twinery. I also got a great deal on this baker's twine from Groop Dealz.

Thanks for stopping by and thanks for the inspiration, Lisa! 

Tuesday, May 29, 2012

Wishing You All Things Wonderful

Hi there! Here's a card I made last month for Daisy, one my favorite school secretaries who transferred to a different school. My son won't be done with his school year until June 15th. I'm sure most of you with school-age kids are already on your Summer break.

All the stamps are from Hero Arts. They were a gift last year from the fabulous Jennifer McGuire. I sewed several dozen flower pins for the Hero Arts booth at CHA last year and sweet Jennifer sent me a lot of stamps as a thank you. The sentiment stamp is from the Just Find Me set.

The papers are from Stampin' Up and Papertrey Ink. I love the weight of their cardstock.


I'm watching "House Hunters" on HGTV right now and the couple featured on the show are searching for a house in Maui. Lucky! Ahhh...love that island!


Well, thanks for stopping by!

Friday, December 16, 2011

With Sympathy

I got the sad news earlier this week that my ex-boss, Fred, passed away right before Thanksgiving from a heart attack. He was the best manager I've ever had. He gave me a lot of independence, but was there for me if I needed his help. He was great!

He and his wife moved out of the Bay Area about 10 years ago and were living in Oklahoma. I made this card for his wife, Gail. 

The card was made with a background stamp from Hero Arts that I stamped using VersaMark ink. I love this background stamp! The large sentiment stamp is also from Hero Arts. I bought the gorgeous canvas butterfly at Michael's. I can't remember who makes it.


Thanks for stopping by!

Sunday, October 2, 2011

Canvas Covered Chipboard - Make It Monday #34 Challenge

I'm back today to finally participate in a Papertrey Ink Make It Monday challenge. This week we were challenged to create our own chipboard accents. I LOVE creating my own chipboard. I do it all the time.

I used the Fillable Frames #4 die to cut some kraft cardstock 5 times. I also used the die to cut some canvas.

I stamped the canvas with the stamps from Fillable Frames #4 set using Chestnut Roan chalk ink. I glued the layers together and punched holes with the Crop-a-Dile. I attached the chipboard to the card front with linen thread.

Thanks for stopping by!

Tuesday, September 6, 2011

Happy Birthday

Hi everyone, hope you are doing well in your part of the world.

Here's a simple card I made a few weeks ago when my friend Ericka was visiting. This card was made with these Hero Arts stamps: Life of the Party Words and Hip Hip Hurray. I love the quality of Hero Arts stamps!

I added a Prima flower and colored the sentiment with Copic markers.

Thanks for stopping by.

Thursday, July 21, 2011

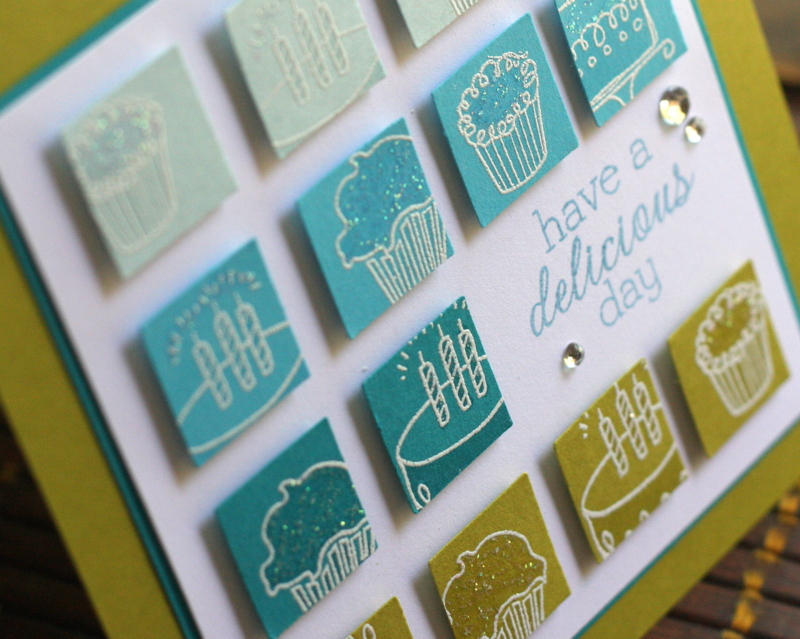
Have a Delicious Day

Thanks for stopping by today. I'm a little sad that Summer Card Camp 2011 is ending this week; it's been a great class. This week these are the colors we are working with.

For my card, I used one of Kristina's sketches. I love using geometric shapes and repetition in my designs.

I stamped various images from the Yummy Treats set by Hero Arts using VersaMark ink and I heat embossed them with white embossing powder. I used a 3/4" square punch to punch our various parts of the images. I also used a VersaMark pen to darken areas on the cakes and cupcakes.
Finally, I added some Diamond Sparkles by PSX and mounted the images with foam tape. I also added a little bling around the sentiment.


Card Ingredients
Stamps: Yummy Treats (Hero Arts)
Paper: Simply Chartreuse, white (Papertrey Ink), Taken with Teal, Tempting Turqoise, Soft Sky (Stampin' Up)
Ink: VersaMark, Taken with Teal
Tools: 3/4" square punch (EK Success)
Other: white embossing powder, VersaMark Pen, rhinestones (Michael's), Diamond Sparles (PSX)

Thursday, July 7, 2011

Happy Birthday

Hi there! Today I'm posting a card for week 2 of Summer Card Camp. Here are the colors this week that I'm working with.
For my card I used this large Hero Arts background stamp and I heat embossed it on kraft cardstock with white embossing powder. (This stamp happens to be the Stamp of the Week on the Hero Arts website.)

I then stamped the same background stamp on the colored cardstock and also heat embossed them with white embossing powder. I cut out different words and added them to the card base with dimensional tape.

Thanks for stopping by!

Friday, April 1, 2011

Happy 6th Birthday, Alexa!

Happy end of the week, everyone! I made this card for my niece, Alexa, who turned 6 a few weeks ago. Sadly, I didn't mail the card in time (bad Auntie!). I used to be more organized with my time and mailing cards early enough. I need a stamp set that is geared towards belated birthday wishes....yes, indeed!


I helped at school all day, so it was fun hearing 2nd graders try out their April Fools tactics on me during lunch. It was mainly them telling me jokes; such a cute age!

I used my Silhouette digital cutter to cut the number 6 using the Bodoni XT font. The patterned paper I cut is from Papertrey Ink. I stamped the background stamp with VersaMark ink and embossed it with clear embossing powder.

Have a good weekend!

Card Ingredients
Stamps: Big Birthday Wishes (Papertrey Ink), Life of the Party Words (Hero Arts), Life of the Party (Hero Arts) <---Thanks, Jennifer McGuire!
Paper: So Saffron, Pumpkin Pie, Elegant Eggplant, Tempting Turquoise (Stampin' Up), By the Numbers Patterned Paper (Papertrey Ink)
Ink: VersaMark (Tsukineko), Black (Memories)
Tools: Silhouette, Corner Chomper (We R Memory Keepers), Heat tool
Other: Bling (Heidi Swapp & Michael's), clear embossing powder, foam tape (3M), Tombow Mono Multi Liquid Glue, Copic Markers

Tuesday, March 29, 2011

Happy Birthday, Esther!

(Sorry, the photos disappeared, so I'm re-posting this blog entry.)
The busy birthday month continues in my family. Today is my sister, Esther's birthday. Here's the card I made for her. The stamps are from Hero Arts. Loved this birthday set. You can never have enough birthday sentiments and images. I dry embossed the cardstock with an embossing folder from Papertrey Ink. I had finished the card, when I accidently smudged the Stickles glitter glue on the card. To minimize my mistake, I scraped away the glitter and rubbed a white ink on the card front. I can still see the mistake, but hopefully you can't.

I popped up the cake with dimension adhesive. I used a Copic marker to highlight some of the details on the cake. The papers are all from Stampin' Up.

Right now I'm listening to music from Aston. They are a classical group from Australia that re-do current songs, like Lady Gaga, Katy Perry, and Coldplay. Check out this site. I'm addicted to their music! They also have YouTube videos here.

Well, I've got to run to school right now. Thanks for stopping by!

Thursday, March 24, 2011

Happy Anniversary, Mom & Dad!

Yesterday was my parent's 48th wedding anniversary. Here's the card I made for them. I used some beautiful stamps from Hero Arts. The Delicate Blossoms set is one of the gifts I received from Jennifer McGuire and Hero Arts for the sewing project I helped with in January.  Thanks, Jennifer and Hero Arts!

Speaking of anniversary, I forgot about my blog's anniversary. I've been blogging since March 13th, 2008. Three years have gone by quickly.

I embossed the Delicate Blossoms with white embossing powder. I used a Copic marker to outline the flowers. I loved when Nichole Heady outlined floral images with a Copic marker. I love the dimension it adds.

That's it, my dears! Thanks for stopping by.

Card Ingredients
Stamps: Delicate Blossoms, Everyday Sayings (Hero Arts)
Paper: white, Simply Chartreuse (Papertrey Ink), Crushed Curry - textured (Stampin' Up)
Ink: VersaMark, Memento Rich Cocoa (Tsukineko)
Tools: Heat tool
Other: white embossing powder, Copic Marker, button (Papertrey Ink), white gel pen (Sakura)

Tuesday, February 1, 2011

Hero Arts Video For Those of Us Who Did Some Sewing

Today was an exciting day. I stayed up until 2 AM to see Libby from PSA Essentials on the Home Shopping Network. I didn't need to stay up, because TiVo was recording the show, but I wanted to see it live. Libby was also on again at 10 AM my time. It was a thrill to see some of my work on TV. More about that tomorrow.

Another reason it was an exciting day was this video I just saw on YouTube. Jennifer McGuire  and Sally Traidman from Hero Arts made a video to thank those of us who did sewing for them in the last 2 weeks. So sweet!

Plus, when I was up late last night, I was browsing pictures on Flickr from the trade show when I saw this picture. Jennifer seems to be wearing one of the flowers I made! I can't be positive, but that is the same fabric I sewed. I don't know how many other people were sewing that particular color of fabric.

Fun, fun, fun!

Monday, January 31, 2011

Made Some Stamped Flower Pins for Hero Arts

These fabric flowers started from a simple Tweet that Jennifer McGuire posted a few weeks ago:
"All you Hero Arts fans - can any of you sew? Reply if you do. Thanks!"

I replied to tell her I knew how to sew (thanks for teaching me at a young age, Mom!). A few days later, I got an email from Jennifer asking for my mailing address so she could FedEx a box with all the supplies to make these amazing flowers. Hero Arts needed hundreds of these to give away at their booth during CHA.

I had seen this video from Sally Traidman several months ago so I knew I had a great tutorial to follow. These flowers are also on the cover of the current Hero Arts catalog and their website.

Sure enough, I quickly received the box with a lot of stamps (Three Leaves, Large Flower, Striped Flower and many more), batting, red and green fabric, paper flowers, buttons, thread, embroidery thread, fabric glue, pin backs, and white felt. I offered to make 50 flowers. They needed a quick turn-around on this project. I landed up FedExing 49 of them to Jennifer's hotel at CHA in LA.  I lost track of the 50th one; I found it later. For 5 of the flowers, I stamped on the reverse side of the red fabric to get a different look. That's the flower in the center of my collage.

Here's how the back of the flower looks. I glued the pin back to the felt circle and I also stitched it to make sure it stays secure.

Here's a picture of one of the flowers on me. This was such a fun project. When I was sewing the third flower, my sewing machine started acting up. I wasted a whole afternoon and evening troubleshooting everything (needle size, tension, upper and lower threading, bobbin). I even added drops of machine oil into the bobbin area for maintenance. I almost put my hands up in the air to give up, but I was persistent. I finally beat the sewing machine into submission. :-)

Thanks, Jennifer and Hero Arts!

Friday, December 31, 2010

Happy New Year!

Hi everyone, I want to wish you a very happy new year! Thanks for visiting my little blog over the last 2.5 years. Thanks for your sweet comments and the inspiration you provide to me. I love how blogging has changed my life. I've gotten to know so many of you around the world. I've been lucky to actually meet several of you in real life, which has been a complete thrill.

Let me tell you the tale of my annual Christmas card that became this Happy New Year card instead. I struggled with the design this year and ran behind schedule. I stamped several "Merry Christmas" and "Feliz Navidad" cards, but then had to switch to making them "Happy New Year" cards instead, since they would not be sent out before Christmas. Several items were pre-determined: I was using this Simply Chartreuse and Plum Pudding paper from Papertrey Ink and the patterned paper from them as well. I also had some patterned paper from Stampin' Up. I loved this swirl background stamp from Hero Arts that I bought when I was in Seattle last month. I wanted to use baker's twine. I wanted the cards to be relatively flat, so they wouldn't cost extra postage. Normally, I'll make about 4 different designs for the card. This year, I had many more variations of the design! Come on, Anthonette, make up your mind!!!

Here's a photo collage of the variations of the design in making the 50 cards.

Next year, I'm going to order a pre-made photo card and then just embellish it slightly. I totally LOVED this card that Kim Hughes ordered from Snapfish and then embellished with baker's twine, buttons, and some cardstock leaves.

Have a good one!

Sunday, August 1, 2010

Birthday Wishes, Kalino!

Today, my favorite Little Guy turns 7! Yikes, where has the time gone? He'll be in second grade at the end of the month.

Today, we're having his Star Wars themed birthday party at my parent's house.

I used my Silhouette to cut the Hero Arts birthday wishes design. I used this card by Kristina as my inspiration to fill the candle and letter with scraps of ribbon. The number 7 stamp is a Martha Stewart stamp. The stamped and embossed So Saffron half circle was a scrap on my desk. Oh, the continuing saga of cleaning off my desk! It will never end.

We'll I didn't get a chance to finish making invitations for Kalino's party, but here's my starting point. I downloaded several free Star Wars fonts and just used Picasa to write on top of the photo.

Thanks for stopping by!

Thursday, July 22, 2010

With Sympathy

The week is flying by. I've got a million things to do before we fly out to New Mexico next week. I've got to get to the mall today to buy the Little Guy some shoes. The shoes he used for school are worn out! He's got flip-flops and Iron Man sandals, but he needs some closed toe shoes.

This card is another item from my desk-cleaning last week. Months ago, I had already stamped the Wallpaper Flowers stamp from Hero Arts, embossed, and colored it with colored pencils. I added the pearlized Dew Drops to each flower and add a scrap of pink patterned paper to the bottom. The string is an upcycled item from some packaging. I don't have that many sympathy sentiments, so this one looks too petite for the scale of the card. The other one was too big, so I had to use this one. Well, I've got to run!

Card Ingredients
Stamps: Wallpaper Flowers (Hero Arts), Teeny Tiny Wishes (SU!)
Paper: kraft, kromekote, pink designer paper (SU!), card base (CA Paper Goods)
Ink: VersaMark, Basic Black (SU!)
Tools: Heat tool
Other: white embossing powder, Dew Drops, string from my stash, foam tape (3M), colored pencils (Crayola)

Tuesday, July 20, 2010

WHOO Loves You?

Hola Chicas! Here's my 3rd card this week made from items already on my desk. No new paper was cut for this card; even the card base was already cut. Everything for this card was in the "archeaological dig" that is my desktop.

I used the Woodgrain Impressions Plate from Papertrey Ink on the base of the card. I love woodgrain! I stamped the tree branch and sentiment from Hero Art's WHOO Loves You stamp set. The frame is a layered element from a digi kit I printed and cut months ago! The little owl is from a set I bought at Michael's last year. The fiber on the card is many years old.

Our friends flew back to Austin this morning, so the Little Guy was sad. He asked me to wake him up at 6 AM so he would have time to visit with them more before they drove back to the airport.

Thanks for stopping by.

Card Ingredients
Stamps: Whoo Loves You (Hero Arts)
Paper: Kraft, Matte Brochure Paper (HP)
Ink: Memento Rich Cocoa (Tsukineko)
Tools: Big Shot with Woodgrain Impression Plate (Papertrey Ink), Corner Chomper (We R Memory Keepers)
Other: Copic markers, fibers, foam tape (3M)

Sunday, July 18, 2010

Birthday Wishes, Lauren

Yesterday, we had a fun get together with a lot of friends plus a birthday party for Lauren, who turned 7. Lauren is the daughter of our best friends that are visiting us from Texas. Here's a card I made for her.

The card fits my theme for the week, which is to use scraps and items already on my desk. I didn't have to cut any paper for this card. The pieces were already sized. The So Saffron patterned paper was already scalloped. I used my Silhouette to cut out this Hero Arts design from a scrap of Melon Mambo textured paper.
I glued a piece of ribbon behind the "i". The tiny pieces of cardstock were trimmed to fit behind the letters.

By coincidence, the gift bag I found in my stash for her presents matched the card; I didn't plan it.

NOW FOR A LITTLE PUBLIC SERVICE ANNOUNCEMENT...
One of the salads I made for the party was Pioneer Woman's Asian Noodle Salad or as she calls it "my most favorite salad, ever, ever, ever, ever". My friends and I give it a huge thumbs up! But speaking of thumbs, I was reminded to RESPECT THE Jalapeño Pepper! I normally wearing a sandwich bag on my hand if I'm chopping anything spicy, like a habanero, serrano, or chile de arbol. I didn't when I finely diced only 2 jalapeños for this salad. Boy did I regret that choice! Several fingers on my right hand suffered a chemical burn from the capsaicin. I tried every treatment I could find on Google and treatments helped temporarily, but it was bad! I had burning for about 24 hours. Anytime my hands would touch warm or hot water, it would reignite the burning. Taking a shower was agony. I didn't dare put contacts on yesterday. My right hand is back to normal today, but I will never underestimate the heat that a jalapeño can have.

Thanks for stopping by!

Card Ingredients
Stamps: Alphabet stamps (Hero Arts),  Clear Toy Transportation (Martha Stewart)
Paper: white kromekote, Pretty in Pink, Whisper White, Pumpkin Pie designer paper, So Saffron designer paper (SU!)
Ink: Tempting Turquoise, Crushed Curry
Tools: Silhouette digital cutter with birthday wishes by Hero Arts (birthday_wishes_C00264_23067)
Other: ribbon scrap, Tombow Mono Multi Liquid Glue, foam tape (3M)

Sunday, April 4, 2010

Easter Greetings

Happy Easter! It was a cold and rainy day here in Northern California. Luckily, the scavenger egg hunt I planned for the Little Guy was an indoor event. He had fun. My Sweetie made dinner, so that was great. I was able to create this card.

To everyone in Baja California and Southern California, I hope you're OK after than large earthquake this afternoon.

This card started with a Baja Breeze cardstock base. I don't have the Hero Arts Cloud background stamp, but I can cut the design on my Silhouette since Hero Arts released this image for the Silhouette. I used the negative as a stencil. I applied white craft ink and then imbossed the image with white embossing powder. I've had this The Cat's Pajamas Spring Fling set since last year and I haven't used 80% of it.

I only own 3 Copic markers, but I used them all on Driving Mr. Carrot! I also did some paper piecing and I used some colored pencils. I forgot to use Memento ink when I stamped the image...oh well. The eggs are also paper pieced.

Thanks for stopping by!

Card Ingredients
Stamps: Spring Fling (The Cat's Pajamas)
Paper: Baja Breeze (SU!), white (Papertrey Ink), patterned paper (Carolyn Gavin for K & Company)
Ink: Memories Black
Tools: Silhouette (with Hero Arts Cloud background), Corner Chomper (We R Memory Keepers), 1 3/8" circle punch & scallop circle punch (SU!), 2" circle punch (Fiskars), embossing gun
Other: Tombow Mono Multi Liquid Glue, foam tape (3M), white embossing powder, Copic markers

Sunday, January 31, 2010

Sending You Sincere, Heartfelt Thanks

Here's a simple card I love that I forgot to post. It's using the Hero Arts butterfly design for the Silhouette. It's the last time I'll use toothpicks behind this butterfly...I promise! See my other toothpick cards here and here.

I cut the butterfly from the a sheet of digi paper from Cheery Glen by Misty Cato (Sweet Shoppe Designs). To give it some shine, I used VersaMark ink on the entire butterfly and embossed it with clear embossing powder. Sorry, you can't see the shine in my photos. I also used the same ink and embossing powder on the "Sending You" part of the sentiment.


Speaking of Sweet Shoppe Designs, I stepped down from the Hybrid Babes Design Team. I didn't have enough time to devote to the SSD community. I'll continue doing hybrid projects. Thanks, Jen, for the awesome inspiration to even try doing hybrid cards!

Card Ingredients
Stamps: Big & Bold Wishes (Papertrey Ink)
Paper: kraft (SU!), Cheery Glen by Misty Cato (Sweet Shoppe Designs)
Ink: VersaMark, Rose Red (SU!)
Tools: Silhouette with butterfly design, Corner Chomper (We R Memory Keepers)
Other: clear embossing powder, toothpicks, Tombo Mono Multi Liquid Glue, white gel pen (Sakura), foam tape (3M)