Saturday, April 30, 2011

Thanks a Bunch!

Hope you're having a great weekend. I'm happy my little family is back together again. My husband was working in Florida all week, and he flew home this afternoon.

Here's some cards I made for Administrative Professionals Day this week. We celebrated Angie and Patti in the front office at school.

I customized their cards with alphabet stamps from Lawn Fawn. The sentiments are heat embossed. I was inspired by the flower bouquets I received last week for being named Volunteer of the Year at Kalino's school. I received 5 bouquets of flowers! Five! I've never received so many flowers at one time. I created the flower bouquets by taking some Prima Flowers and added a burlap circle underneath. I added baker's twine to secure the burlap. The bouquets were attached to the card with Extreme Adhesive Squares. I distressed the Crate Paper edges and did some faux stitching.

Thanks for stopping by!

Monday, April 25, 2011

PSA Essentials Will Appear on HSN Tomorrow Morning

Hi everyone, just wanted to let you know that Libby will be appearing on the Home Shopping Network again starting tomorrow (Tuesday, April 26th) morning at 6AM EST. She will appear again at 11AM EST. 

She said that specific times are 6:50 and 11:35 AM. Here are the details on the PSA Essentials blog.

Sunday, April 24, 2011

To One of My Favorite Peeps

Happy Easter! I made this card for Kalino. He looks forward to the Easter scavenger hunt I do each year for him. I haven't created the 12 clues yet and it's already after lunch time; behind schedule!

The weather is nice, so I was going to do the scavenger hunt outside, but late last night I heard some loud noise outside my studio window. Sure enough, I'm guessing it was raccoons that broke into the vent to get into the crawl space under the house. We're not going near that open vent; darn raccoons!

I bought these cute stamps at the A Muse store in Seattle last November. I couldn't resist them.

Well, I've got to run.

Card Ingredients
Stamps: Peep, Favorite Peeps (A Muse)
Paper: white textured, Crushed Curry (Stampin' Up)
Ink: Basic Black, Daffodil Delight (Stampin' Up), VersaMark (Tsukineko)
Tools: Corner Chomper (We R Memory Keepers), Silhouette digital cutter with label design
Other: baker's twine (House of 3 Pink Paislee), foam tape (3M)

Saturday, April 23, 2011

Egg Heart Card

Here's a final Easter card I designed for my PSA Essentials monthly assignment. This is my favorite of the bunch I've been showing you this week.

I stamped the egg shaped repeatedly on white cardstock. Using Copic markers, I colored in the eggs. I cut the eggs out and layered them on a heart-shaped piece of chipboard that I made. I added Diamond Glaze to the entire heart and let it dry overnight. It came out looking so nice and shiny. This would actually make a cute piece of jewelry. You could glue the heart to a pin back.

Here's a closeup of the yummy heart. Have a good one!

Card Ingredients

Finished Size: 4.25” x 4.25”
Stamps: Topiary (PSA Essentials)
Paper: Melon Mambo - textured (Stampin’ Up), white & Lemon Tart (Papertrey Ink)
Ink: Memento Tuxedo Black (Tsukineko)
Tools: Martha Stewart Scoring Board, Silhouette digital cutter with label design, Heart punch (Stampin’ Up), Corner Chomper (We R Memory Keepers)
Other: Copic markers (Y35, RV13, BG02, YG13, YG11, BV04, YR04), foam tape (3M), Tombow Mono Multi Liquid Glue, Lemon Tart ribbon (Papertrey Ink), silver thread (from Peru), Diamond Glaze (JudiKins)

Card Instructions
  1. Make card from cardstock and round corners.
  2. Use a digital cutter to cut fancy label shape. Tie some ribbon around the front of the card and attach the fancy label.
  3. Stamp egg image repeatedly on white cardstock and color with various Copic markers.  Cut out egg designs.
  4. Punch large heart shape 4 times and glue layers together to create your own chipboard.
  5. Glue the eggs to the heart by overlapping to cover the chipboard. Trim off the excess.
  6. Pour Diamond Glaze onto the surface of the chipboard heart and allow to dry overnight.
Tip: Don’t shake the Diamond Glaze bottle; it will create air bubbles.
  1. Stamp sentiment on card and attach heart.
Friday, April 22, 2011

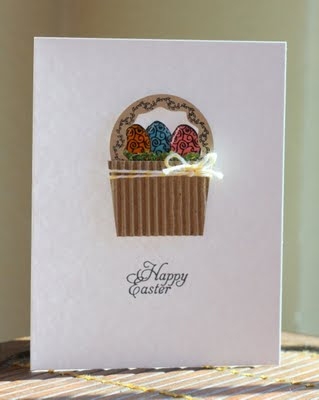
Happy Easter Basket and a Giveaway at the PSA Essentials Blog

Hi everyone, Happy Earth Day! Today, several of my Easter cards are featured on the PSA Essentials blog. You have a chance (more if you spread the word) to win the Topiary set of stamps. Go here to enter before Easter Sunday ends EST.

Here's one of the cards. The bottom on the basket is a recycled Starbucks coffee jacket. I love incorporating recycled items when I can. The handle of the basket is the circular stamp that comes with the stamp set.

Here's a closeup of the basket. I used Diamond Glaze on the eggs to give them a glossy shine. I also added some "grass" to the basket with some JudiKins Speckles.

Don't forget to enter to win on the PSA Essentials blog. Have a great day!

Card Ingredients
Card Finished Size: 4.25” x 5.5”
Stamps: Topiary (PSA Essentials)
Paper: kraft (Stampin’ Up), white (Papertrey Ink), coffee jacket (Starbucks)
Ink: Memento Tuxedo Black (Tsukineko)
Tools:  Martha Stewart Scoring Board, 1¾“ circle punch (Stampin’ Up), scalloped scallop edge punch (EK Success)
Other: baker’s twine (Divine Twine), foam tape (3M), Copic markers (BV05, YR04, RV13), Diamond Glaze (JudiKins), Spring Meadow Speckles (JudiKins), Tombow Mono Multi Liquid Glue

Card Instructions
  1. Make card from cardstock.
  2. Stamp egg image repeatedly on white cardstock and color with various Copic markers.  Cut out egg designs.
  3. Pour Diamond Glaze onto the surface of the eggs and dry thoroughly.
Tip: Don’t shake the Diamond Glaze bottle; it will create air bubbles.
  1. Trim a corrugated coffee jacket to resemble the bottom of a basket. Tie some baker’s twine around the basket.
  2. Stamp the round border design on kraft cardstock and punch out with circle punch. Cut inside design to create a handle. Adhere to create basket shape.
  3. Punch out scalloped cardstock. Cover with adhesive and add grass Speckles. Add to basket.
  4. Stamp sentiment on card front.
  5. Adhere dry eggs, grass, and basket to card front with dimensional adhesive.

Thursday, April 21, 2011

Happy Easter Bunnies

This Easter card coordinates with the tag I posted yesterday. I just love those little bunnies!

Well, I've got to run. Thanks for stopping by!

Card Ingredients
Finished Size: 4.25” x 5.5”
Stamps: Little Bunny, Topiary (PSA Essentials)
Paper: White, Summer Sunrise, & Hawaiian Shores patterned paper (Papertrey Ink), Gable Green (Stampin’ Up)
Ink: Memento Tuxedo Black (Tsukineko), Cool Caribbean (Stampin’ Up), VersaMark (Tsukineko)
Tools: Big Shot with Limitless Labels metal die (Papertrey Ink), Scalloped Scallop punch (EK Success), Corner Chomper (We R Memory Keepers)
Other:  Copic marker (YR32), Tombow Mono Multi Liquid Glue, Hawaiian Shores ribbon (Papertrey Ink), rhinestones (Michael’s), sponge

Card Instructions
  1. Make card from cardstock.
  2. Use die cutting machine to cut tag. Stamp circle design on “sun” with watermark ink.
  3. Stamp bunnies on white cardstock and color with Copic marker. Cut out bunnies.
  4. Punch out scalloped green cardstock. Use scissors to create the look of grass.
  5. Use a scallop circle and blue ink to sponge clouds on the card front.
  6. Adhere patterned paper to the bottom of the card front and round the bottom corners.
  7. Adhere sun, grass, and bunnies to the card front.
  8. Add ribbon and rhinestones.
  9. Stamp Happy Easter sentiment.

Wednesday, April 20, 2011

Happy Easter Tag

Hi dearies! I'm still in vacation mode, even though vacation has been over for several days. Maui, I miss you! I've got several Easter projects to post this week, so let's get started.
Here's a closeup of the tag. This tag would be cute on an Easter basket. I used PSA Essentials Little Bunny set for the bunny image and the Topiary set for the sentiment.

Have a great day!

Tag Ingredients
Finished Size: 3.75” x 2.75”
Stamps: Little Bunny, Topiary (PSA Essentials)
Paper: White, Summer Sunrise, & Hawaiian Shores patterned paper (Papertrey Ink), Gable Green (Stampin’ Up)
Ink: Memento Tuxedo Black (Tsukineko)
Tools: Big Shot with Mat Stack 5 metal die (Papertrey Ink), Scalloped Scallop punch (EK Success), Crop-a-Dile (We R Memory Keepers)
Other:  Copic marker (YR32), Tombow Mono Multi Liquid Glue, Hawaiian Shores ribbon (Papertrey Ink), rhinestones (Michael’s), baker’s twine (Etsy)

Tag Instructions
  1. Use die cutting machine to cut tag from 3 colors of paper. Trim and piece together to form one tag.
  2. Stamp bunnies on white cardstock and color with Copic marker. Cut out bunnies.
  3.  Punch out scalloped green cardstock. Use scissors to create the look of grass.
  4. Adhere grass and bunnies to the tag.
  5. Add ribbon and rhinestones.
  6. Stamp Happy Easter sentiment. 
  7. Punch hole in tag and add an eyelet. Add baker’s twine to the eyelet.

Tuesday, April 12, 2011

10 Years Ago Today...

... I married this sweet man on a beach here in Maui in 2001. Can I just say, eloping was one of the best decisions ever! No stress and no major expense.

We are celebrating our 10th anniversary here in our favorite place. Besides being married here, we gave our son a Hawaiian name; that's how much we love Maui! I was 6 months pregnant when we vacationed here in 2003 as our last celebration before becoming parents. Leaving the Kahului airport, we finalized Kalino as the choice for the Little Guy. Kalino means "bright one".

I intended to make an anniversary card for my husband using this picture, but I ran out of time.

Yesterday I was totally thrilled to finally meet Jen Tapler! We started blogging at the same time 3 years ago. I've known who she was since then. I got to see her very nice studio space. We went to lunch at Flatbread Company in Paia. Awesome pizza, salad, and the best sugar cane root beer. I had a lot of fun talking with her.

Thanks for stopping by!

Sunday, April 10, 2011

Our View of Paradise This Week

We flew to Maui yesterday. Here's our view for the coming week. I love this place! I first visited Maui over 20 years ago and fell in love with it. It's been 4 years since our last visit and I've missed it.

As I type, there's a gecko on the wall behind the TV. Kalino is not thrilled and wants it out now, but we're trying to explain that the gecko just wants to find a meal. It will leave on it's own to find food outside.

I'm having lunch tomorrow with Jen Tapler. We've been blogging friends for about 3 years. We've talked on the phone before, but I look forward to actually meeting her.

Last week I found out I have a first cousin that lives on Maui. He's flying back from New Mexico tomorrow, so I'm going to give him a call and make time to see him.

While waiting for our luggage at the baggage claim, a little kid next to me turned around. I recognized him! He said "Hi, Mrs. Chavez". He's a first grader at Kalino's school! I volunteer in the library when he comes in each week. I met his mom and aunt. During their layover in Honolulu they also saw a 2nd grade teacher from our school. Small world, isn't it?

I wish you well in your part of the world. Later!

Wednesday, April 6, 2011

Happy Botday!

I love robots! It could be the influence of my 7-year old on me, but I can't resist a cute robot. My nephew Stephen turned 6 this past weekend and had an awesome Star Wars-themed party. I decorated his gift bag and created this matching gift tag. The stamps are the Best Bots set from Stampin' Up.

I cut the tag with my Silhouette digital cutter and adhered different Cosmo Cricket Cogsmo Robot paper to it. On the tag and gift bag I stamped the robots and colored them with Copic markers. I layered their torsos on with foam tape to add some dimension.

The white paper I used on the gift bag was totally wrong for coloring with Copic markers. It was matte kromekote paper instead of a Copic-friendly paper.

I added some cool masculine brads and some baker's twine (you know how I LOVE baker's twine). That's it.

We're getting ready to go on Spring Break, so I'm busy, busy, busy. Later!

Friday, April 1, 2011

Happy 6th Birthday, Alexa!

Happy end of the week, everyone! I made this card for my niece, Alexa, who turned 6 a few weeks ago. Sadly, I didn't mail the card in time (bad Auntie!). I used to be more organized with my time and mailing cards early enough. I need a stamp set that is geared towards belated birthday wishes....yes, indeed!


I helped at school all day, so it was fun hearing 2nd graders try out their April Fools tactics on me during lunch. It was mainly them telling me jokes; such a cute age!

I used my Silhouette digital cutter to cut the number 6 using the Bodoni XT font. The patterned paper I cut is from Papertrey Ink. I stamped the background stamp with VersaMark ink and embossed it with clear embossing powder.

Have a good weekend!

Card Ingredients
Stamps: Big Birthday Wishes (Papertrey Ink), Life of the Party Words (Hero Arts), Life of the Party (Hero Arts) <---Thanks, Jennifer McGuire!
Paper: So Saffron, Pumpkin Pie, Elegant Eggplant, Tempting Turquoise (Stampin' Up), By the Numbers Patterned Paper (Papertrey Ink)
Ink: VersaMark (Tsukineko), Black (Memories)
Tools: Silhouette, Corner Chomper (We R Memory Keepers), Heat tool
Other: Bling (Heidi Swapp & Michael's), clear embossing powder, foam tape (3M), Tombow Mono Multi Liquid Glue, Copic Markers