Monday, January 31, 2011

Made Some Stamped Flower Pins for Hero Arts

These fabric flowers started from a simple Tweet that Jennifer McGuire posted a few weeks ago:
"All you Hero Arts fans - can any of you sew? Reply if you do. Thanks!"

I replied to tell her I knew how to sew (thanks for teaching me at a young age, Mom!). A few days later, I got an email from Jennifer asking for my mailing address so she could FedEx a box with all the supplies to make these amazing flowers. Hero Arts needed hundreds of these to give away at their booth during CHA.

I had seen this video from Sally Traidman several months ago so I knew I had a great tutorial to follow. These flowers are also on the cover of the current Hero Arts catalog and their website.

Sure enough, I quickly received the box with a lot of stamps (Three Leaves, Large Flower, Striped Flower and many more), batting, red and green fabric, paper flowers, buttons, thread, embroidery thread, fabric glue, pin backs, and white felt. I offered to make 50 flowers. They needed a quick turn-around on this project. I landed up FedExing 49 of them to Jennifer's hotel at CHA in LA.  I lost track of the 50th one; I found it later. For 5 of the flowers, I stamped on the reverse side of the red fabric to get a different look. That's the flower in the center of my collage.

Here's how the back of the flower looks. I glued the pin back to the felt circle and I also stitched it to make sure it stays secure.

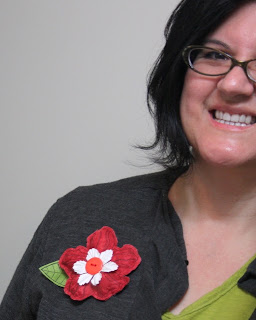
Here's a picture of one of the flowers on me. This was such a fun project. When I was sewing the third flower, my sewing machine started acting up. I wasted a whole afternoon and evening troubleshooting everything (needle size, tension, upper and lower threading, bobbin). I even added drops of machine oil into the bobbin area for maintenance. I almost put my hands up in the air to give up, but I was persistent. I finally beat the sewing machine into submission. :-)

Thanks, Jennifer and Hero Arts!

Sunday, January 30, 2011

Parents-To-Bee Invitation

Hi my dears, here's an invitation I made for my sister-in-law and brother-in-law's baby shower last week. This invitation is actually a hybrid of a free bridal shower invitation download that I added stamping and cardstock to. I only made 4 of these invites since we used Evite to invite everyone to the shower. I made these for people who don't use email everyday.

I downloaded the invitation from Download & Print. Using Microsoft Word, I updated the text and printed it out on brochure paper. Since the invitation had a honey comb pattern, I used the bee image from Papertrey Ink's Baby Button Bits set. I used a black Copic marker to draw lines on a yellow button. I added a narrow strip of black cardstock to the invitation and a layer of black cardstock to make the invitation have more weight. I rounded all the corners with my Corner Chomper.

That's it! Simple right? Have a good one. I'll be back tomorrow.

Invitation Ingredients
Stamps: Baby Button Bits (Papertrey Ink)
Paper: brochure paper (HP), Basic Black (Stampin' Up)
Ink: Tuxedo Black (Tsukineko)
Tools: Computer, Microsoft Word, printer, Corner Chomper (We R Memory Keepers)
Other: Copic markers, lemon tart button (Papertrey Ink), Tombow Mono Multi Liquid Glue, Glue Dots

Wednesday, January 26, 2011

Paper Rosette Flower Arrangement Using Lawn Fawn Stamps


This past Saturday, we had a baby shower for my sister-in-law and brother-in-law. My new niece, Sabina, is due in a few weeks. I did a few stamping projects for the shower, including this paper rosette (or paper medallion) flower arrangement. In my rush, I didn't get enough pictures and I didn't notice that one flower is turned around.

I used Lawn Fawn stamps Bannerific and Jessie's ABCs on the vase and flowers. I mainly used paper from the Dear Lizzy Enchanted collection and some older Chloe's Closet paper for the paper rosettes. I would definitely recommend you use a tool like the Martha Stewart Scoring Board for scoring all the papers.

There are several tutorials out there on how to make these paper rosettes. If you've never tried making these, here's just one from Martha Stewart.

Ingredients:
Stamps: Bannerific, Jessie's ABCs (Lawn Fawn)
Paper: Dear Lizzy Enchanted (American Crafts), Chloe's Closet (Making Memories), white (Papertrey Ink)
Ink: Memento Tuxedo Black
Tools: Martha Stewart Scoring Board, Big Shot with Mat Stack 5 metal die ( Papertrey Ink), 3/4" circle punch (Stampin' Up), 1" circle punch (Stampin' Up)
Other: heart doily (Target), buttons (Papertrey Ink & Making Memories), glue gun, foam tape (3M), bamboo skewers, vase, paper grass, rhinestones (Michael's), Copic marker, redline tape

Monday, January 24, 2011

CPS Card Sketch #202

Hi everyone, this week PSA Essentials is a sponsor on the Card Positioning Systems blog. Here's a card I created for CPS Sketch #202.

The card starts with a stamp from the Frenchie stamp set by PSA Essentials. The next major component is the embossed background on the card. That is a Texturz Plate from Stampin' Up. I also die cut some black felt with a Limitless Layers die from Papertrey Ink.

Well, thanks for stopping by! If you have a chance, please participate in the CPS sketch challenge.


Card Ingredients
Stamps: Frenchie (PSA Essentials)
Paper: white, melon berry, summer sunrise (Papertrey Ink)
Ink: black (PSA Essentials)
Tools: Big Shot with Backgrounds 1 Texturz Plate from Stampin' Up, Limitless Layers die (Papertrey Ink), 1.75" circle punch (Stampin' Up)
Other: Basic Black satin ribbon (Stampin' Up), white gel pen (Sakura), felt (Papertrey Ink), gems (Heidi Swapp) 


Saturday, January 15, 2011

Happy Birthday, Nico!

Today we went to the 8th birthday party for one of Kalino's best friends and classmates, Nico. I made this card for him.

I've been so sleep-deprived this week from working really hard in the studio, that I actually took a nap earlier. I rarely take a nap. I'm happy it's a 3-day weekend here.

This card is super simple and uses two designs I cut with my Silhouette machine: the happy birthday circle tag and the number 8. I can't remember the font I used for the 8. I trimmed off the tag holder part of the circle. For a finishing touch, I added a small star.

Just to remind you, you really get your value from the Silhouette machine because you can cut fonts you already have on your computer. Normally, I don't cut Papertrey Ink paper with my machine, since it is a heavier cardstock, but the machine easily cut the number 8 (it's a simple design). The kraft cardstock is a lighter weight cardstock, so the Silhouette easily cuts this intricate design.

I have some cool projects I'm working on this week. One of them involves stamps, ink, fabric, sewing, and batting (all on the same project). I'll let you know more later. Thanks for stopping by! Have a good one.

Card Ingredients
Stamps: none
Paper: Orange Burst, Simply Chartreuse, & Lemon Tart (Papertrey Ink), Kraft (SU!)
Ink: none
Tools: Star punch (SU!), Silhouette cutter, Corner Chomper (We R Memory Keepers)
Other: white gel pen (Sakura), foam tape (3M)

Monday, January 10, 2011

Love, Love, and More Love

I hope you had a great weekend. I spent what felt like most of the day on Saturday taking down our Christmas tree and packing up all Christmas related items. The Little Guy was extremely sad. If it was up to him, the tree and decorations would stay up all year.

Here's a card I designed for PSA Essentials using the Bouquet Toss stamp set. I stamped the image many times using Tuxedo Black Memento ink. Without paying attention to staying in the lines, I colored the hearts with different Copic markers. I cut out each heart and adhered each to a white card base. For added interest, I covered one of the hearts with Crystal Effects and let it dry overnight.

Here's a closeup to show how I used Crystal Effects on one of the hearts and some dimensional adhesive to lift the heart off the card.

Card Ingredients
Stamps: Bouquet Toss (PSA Essentials)
Paper: white (Papertrey Ink)
Ink: Memento Tuxedo Black (Tsukinenko)
Tools: Scoring Board (Martha Stewart)
Other: Tombow Mono Multi Liquid Glue, Copic markers, foam tape (3M), Diamond Glaze (JudiKins)

Instructions
  1. Create a 4.25" x 5.5" card base.
  2. Repeatedly stamp the heart on a separate pieces of white cardstock. Use Memento ink since it will not smear with you color in with Copic markers.
  3. Color hearts with various Copic markers.
  4. Trim out each heart.
  5. Use Diamond Glaze on one heart and set aside for dry completely.
  6. Arrange hearts on card and attach to the card base.
  7. For texture, use dimensional adhesive to attach the one heart.

Wednesday, January 5, 2011

Joy Peace Love

Here's a holiday card I never posted. I designed it for PSA Essentials a few months. It uses the Treeo stamp set and it includes a die cut of wood veneer. I found this wood veneer paper at Michael's for a really inexpensive price. I love the wood veneer, but after working with it, I found I'm allergic to it; makes my arms itch like crazy.

Please add the PSA Essentials blog (PSA Stamp Camp) to your list of blogs you check-out. Become a follower on Twitter and Facebook too. Libby is hosting inspiration challenges and having frequent giveaways.

Thanks for stopping by!

Card Ingredients
Stamps: Treeo (PSA Essentials)
Paper: Tempting Turquoise (Stampin' Up), white
Ink: Turquoise (PSA Essentials)
Tools: Scoring Board (Martha Stewart), 1/2" circle punch (Stampin' Up), Big Shot with Papertrey Ink die, Crop-a-Dile (We R Memory Keepers)
Other: Tombow Mono Multi Liquid Glue, Tempting Turquoise ribbon (Stampin' Up), Build-a-brad kit (Stampin' Up), foam tape (3M), wood veneer paper (Michael's)

Tuesday, January 4, 2011

Bridal Shower

Hi everyone, here's a simple card using an A Muse notecard and stamps. I made this in Seattle when I visited Ericka.

I used Copic markers to color the image and a little bit of Stickles. I added some pink/white baker's twine to finish it off. Simple!

Thanks for stopping by.